Published on 2nd June, 2021 by Mikkel Bech
How this site was built

Sachsendam near Kongsberg, Norway © BechBox
The JAMstack is all the rage these days - and for good reason as it offers some clear benefits over the traditional web architecture (if you don't know what the JAMstack is, start here). I've chosen the static site generator Gatsby to re-build this website using Contenful as CDN and Github+Netlify for super easy deployment.
This is a how-to guide if you want to get started with static site generation using this particular stack.
1. install Gatsby if you haven’t already:
1npm i -g gatsby-cli(if you've never used Node before go here and follow the guide)
2. create new gatsby app:
1gatsby new bechbox.com3. Alter site metadata in gatsby-config.js:
1siteMetadata: {
2title: `BechBox`,description: `Photography, CGI, Service Design, Data Science, Video, Development ... you name it`,author: `@bechbox`,},
4. Contentful:
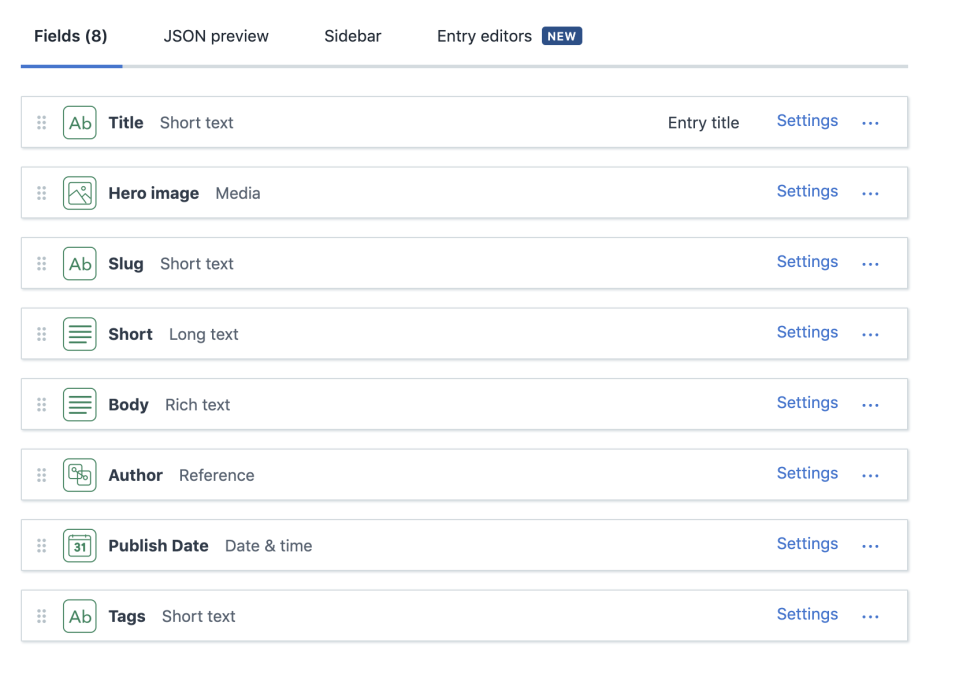
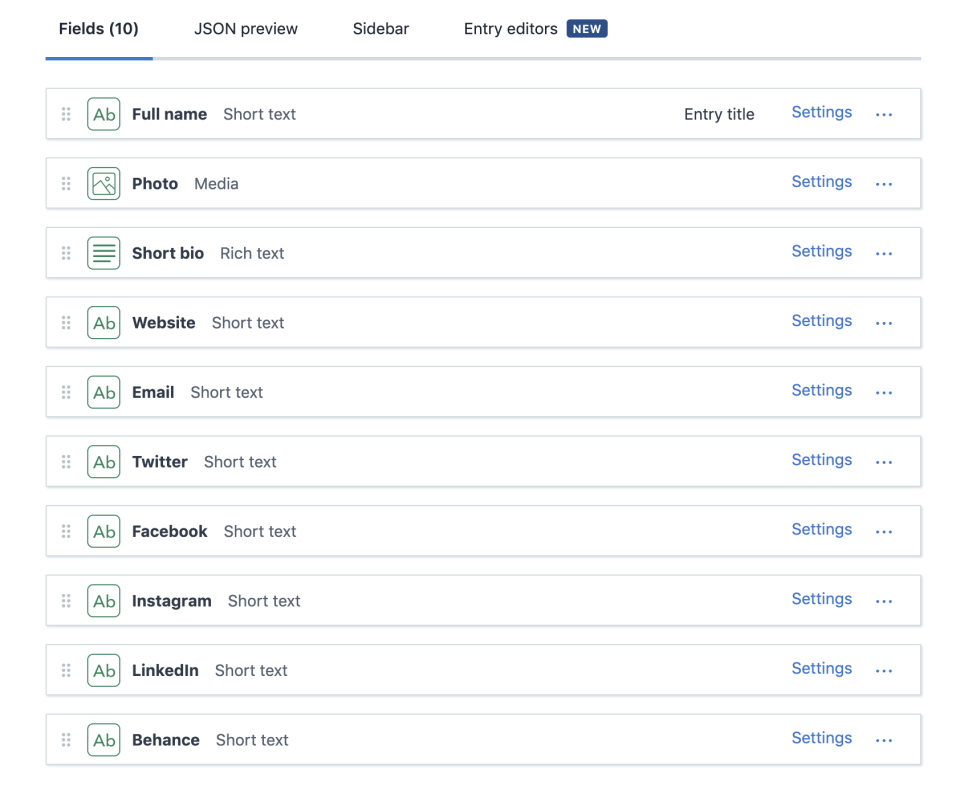
Create free Contentful account “Add a Space” > Community Build content models - here's mine for blog post and author:

Contentful - blog post © BechBox

Contentful - author © BechBox
5. Add some content on Contentful
6. Install contentful plugin and add plugins to gatsby-config.js:
1npm install gatsby-source-contentful1`gatsby-transformer-remark`,
2 {
3 resolve: `gatsby-source-contentful`,
4 options: {
5 spaceId: "",
6 accessToken: "",
7 },
8},7. Connect Contentful and Gatsby:
In Contentful find SpaceId and token in Settings > API Keys (or generate them if necessary) Make file in root .env.development:
1CONTENTFUL_SPACE_ID="<your-contentful-space-id-here>"
2CONTENTFUL_ACCESS_TOKEN="<your-contentfull-access-token-here>"
Make sure following is in .gitignore:
1# dotenv environment variable files
2.env*
Add to beginning of gatsby-config.js:
1require("dotenv").config({ path: `.env.${process.env.NODE_ENV}`,})And then set:
1`gatsby-transformer-remark`,
2    {
3      resolve: `gatsby-source-contentful`,
4      options: {
5        spaceId: process.env.CONTENTFUL_SPACE_ID,
6        accessToken: process.env.CONTENTFUL_ACCESS_TOKEN,
7      },
8    },
If you’re using the same content for both development and production:
1cp .env.development .env.production8. Fix linking:
Use Gatsby Link only for internal links - fix by adding this component and using that instead of Gatsby link:
1import { Link as GatsbyLink } from "gatsby"
2import React from 'react'
3// Since DOM elements <a> cannot receive activeClassName
4// and partiallyActive, destructure the prop here and
5// pass it only to GatsbyLink
6const Link = ({ children, to, activeClassName, partiallyActive, ...other }) => {
7// Tailor the following test to your environment.
8// This example assumes that any internal link (intended for Gatsby)
9// will start with exactly one slash, and that anything else is external.
10  const internal = /^\/(?!\/)/.test(to)
11// Use Gatsby Link for internal links, and <a> for others
12  if (internal) {
13    return (
14      <GatsbyLink to={to}
15        activeClassName={activeClassName}
16        partiallyActive={partiallyActive}
17        {...other}
18      >
19        {children}
20      </GatsbyLink>
21  )}
22  return (
23    <a href={to} {...other}>{children}</a>)
24}
25
26export default Link
9. Start local site:
In a terminal write
1gatsby develop10. Setup rich text support:
Install rich text renderers:
npm install @contentful/rich-text-react-renderer @contentful/rich-text-types
to use new raw access for rich text
11. Create page to list blog posts.
cd src/pages/ touch blog.js
You can use mine as a template: blog.js
12. Edit gatsby-nodes.js to make dynamically created pages:
1const path = require("path")
2exports.createPages = async ({ graphql, actions }) => {
3  const { createPage } = actions
4  const response = await graphql(
5    `query {
6      allContentfulBlogPost {
7        edges {
8          node {
9            slug
10          }
11        }
12      }
13    }
14  `)
15  response.data.allContentfulBlogPost.edges.forEach(edge => {
16    createPage({
17      path: `/blog/${edge.node.slug}`,
18      component: path.resolve("./src/templates/blog-post.js"),
19      context: {
20        slug: edge.node.slug,
21      },
22    })
23  })
24}
13. Create the blog post template:
1cd src/
2mkdir templates
3cd templates/
4touch blog-post.js
14. Build the blog post template
As an exercise see if you can build the template based on the knowledge from this article so far
15. Commit working site to Github
16. Create account on Netlify
17. On Netlify select “New Site from Git”
If your repo doesn’t show up select “Configure the Netlify app on GitHub” and follow instructions
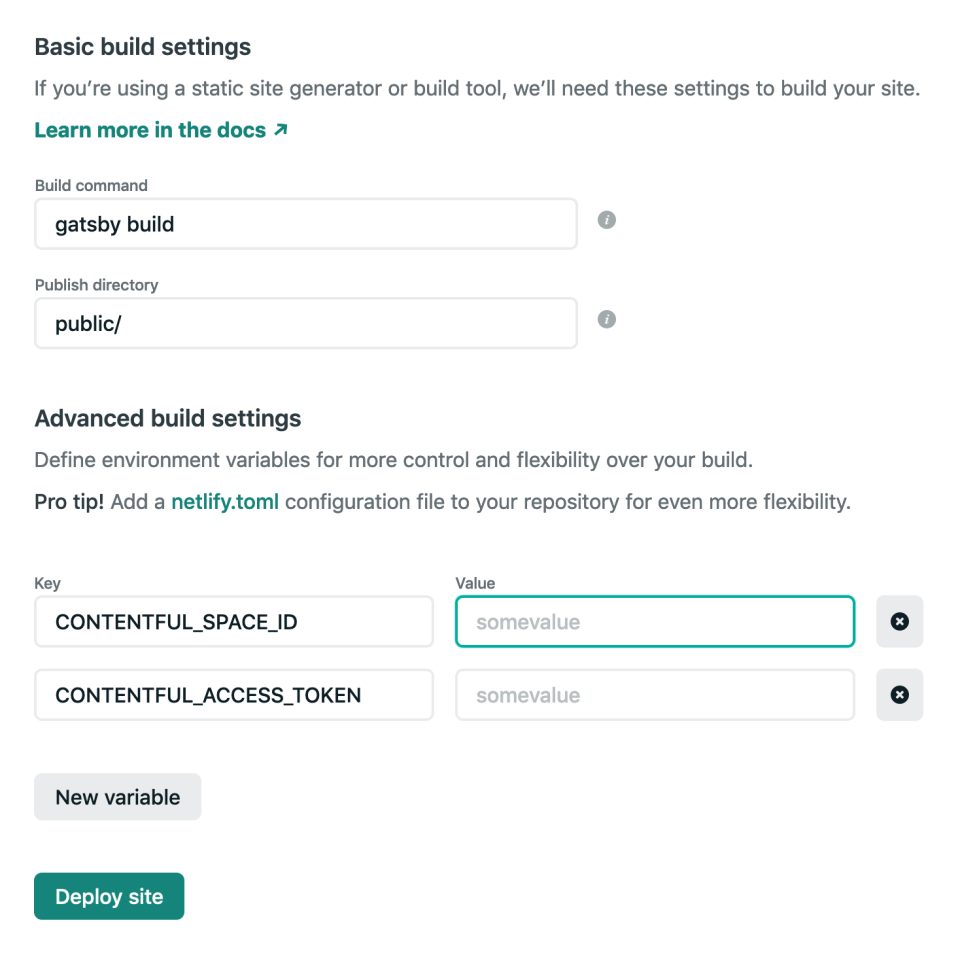
After selecting the repository choose “gatsby build” as your build command and leave publish directory at “publish/“
18. Click the “Show advanced” button and input your API keys from Contentful

Netlify settings © BechBox
That's it. You can click "Deploy site" now to test the setup and hereafter the site will deploy automatically every time you commit anything to the master branch in Git

